
In Google Analytics, you can use custom filters mainly for achieving three goals: excluding unwanted traffic, creating custom views, and manipulating data. Each of these can be extremely useful and we are going to take a closer look at all of them.
This article is a part of our very popular series called “Most common Google Analytics issues (in-depth overview)” where we go into great detail of every aspect of Google Analytics. This time, we are going to cover everything you need to know about Google Analytics Filters.
We are splitting this article into three sections based on these three goals to achieve:
- Excluding unwanted traffic
- Creating custom views
- Manipulating data
With no longer ado, let’s take a closer look at the Google Analytics filters that will help you customize your setup specifically for your business.
But first, let me quickly show you how you can create a new filter in Google Analytics.
How to create Google Analytics Filters
First of all, as you can see in the image below, you can create filters on two different levels: Account or View.
Our recommendation is: unless you need to use custom Dimensions or Metrics in the filter criteria, always create your filters Account level, and then apply them to the Views accordingly.
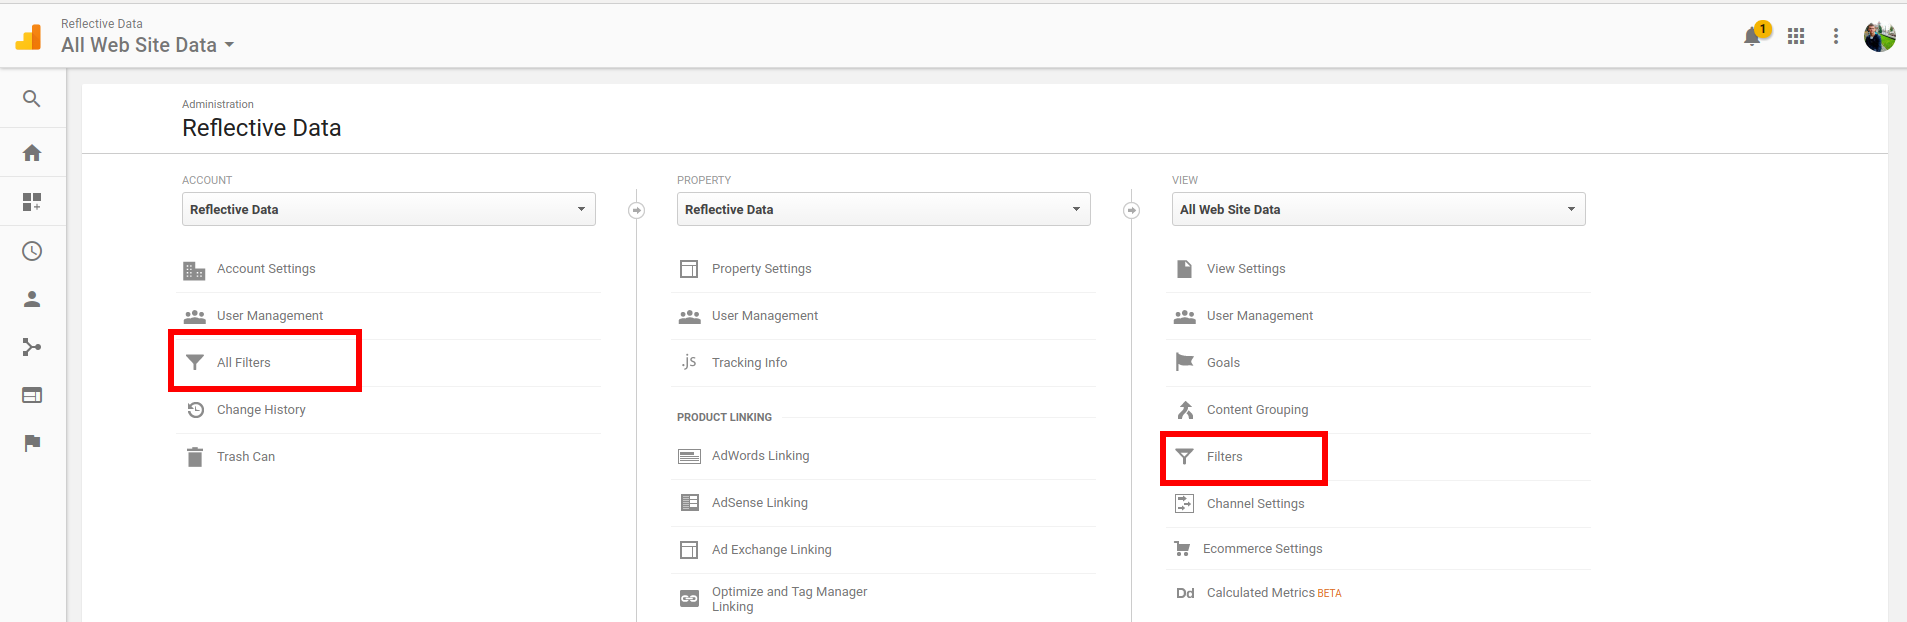
Next, click on All Filters and then Add Filter, after that you will be taken to a new filter wizard.
More details on the specific sections will be discussed below, but here’s how the wizard looks like:

Read more on about Google Analytics Filters.
Filters don't work retroactively!
When you create a new filter, it won’t apply to your historical data. Only the data that’s being collected after creating the filter will be affected.
Mind the order!
The filters are being applied in order. The default order is based on the date of creation. You can change the order manually if needed.
Excluding unwanted traffic
There are all sorts of traffic that you, for some reason, don’t want to see in your reports. Right now, we are going to take a look at the most popular ones that almost everyone should consider excluding from their main reporting view.
This filter should be applied to all views that are used for general reporting. Excluded should be all internal IP addresses, also the IP-s of the third party contractors who might visit your website for some other reason than your main target audience.
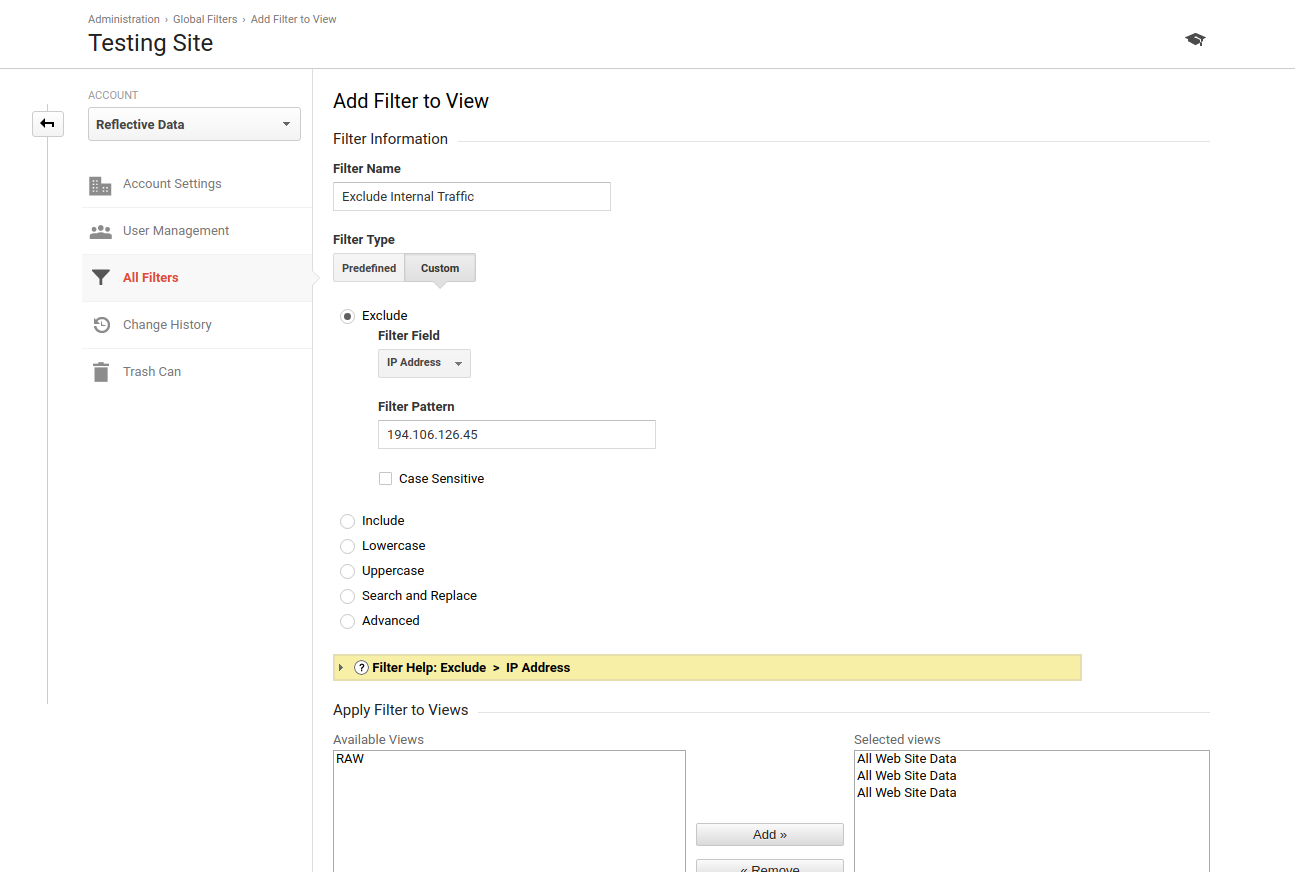
Here’s how you can create a filter for specific IP address:
- Filter Name: Exclude Internal Traffic
- Filter Type: Custom > Exclude
- Filter Field: IP Address
- Filter Pattern: your internal IP address
- Regex is allowed
- Views: all the views you want to apply the filter to
- Save
This is how your filter should look like:
Exclude traffic from development site
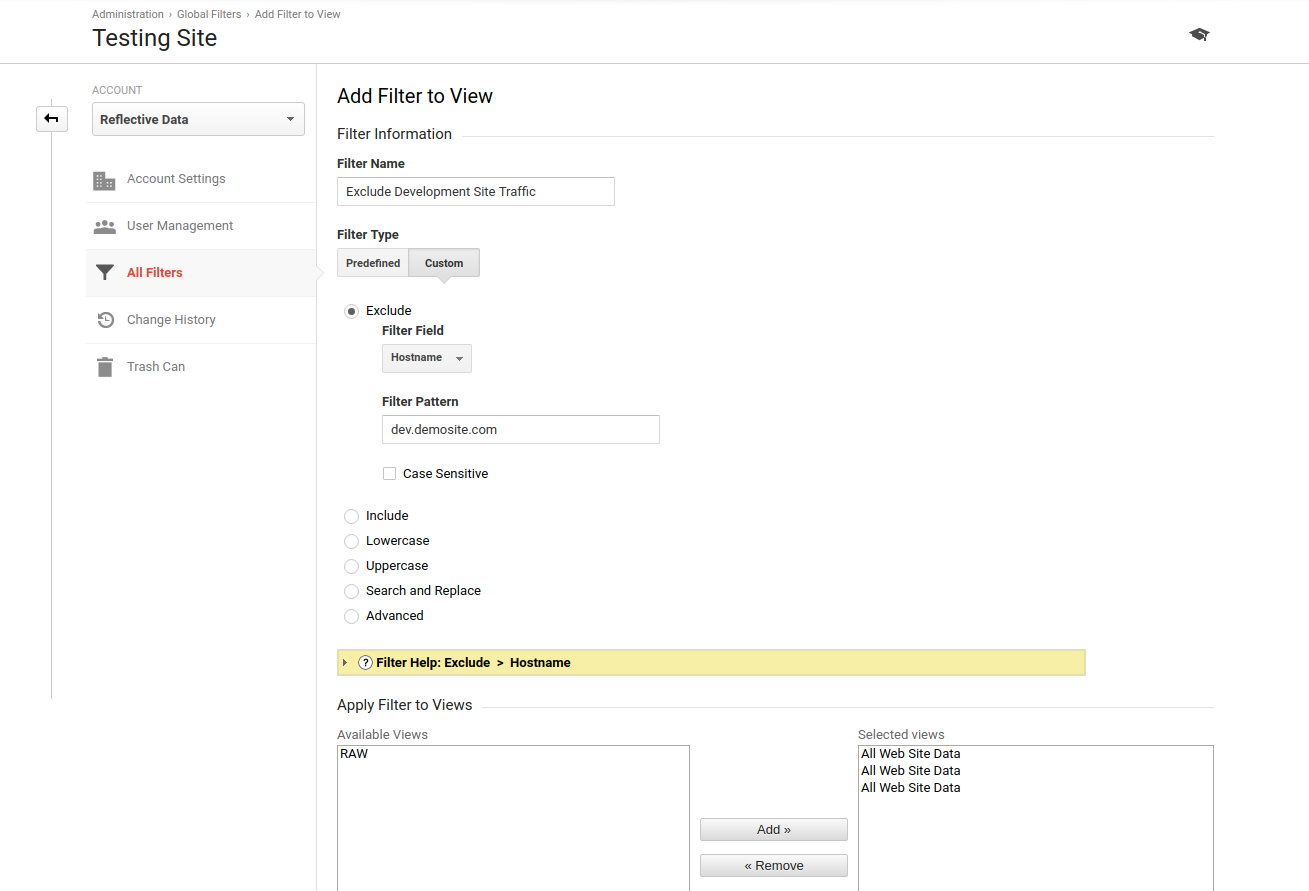
As your development site is not being used by real customers, you will probably want to entirely exclude traffic from there.
Here’s how you can create a filter for development site:
- Filter Name: Exclude Development Site Traffic
- Filter Type: Custom > Exclude
- Filter Field: Hostname
- Filter Pattern: your dev site address
- Regex is allowed
- Views: all the views you want to apply the filter to
- Save
This is how your filter should look like:
Exclude bot traffic
Excluding bot traffic from your Google Analytics reports is important as they might be eating up your quotas as well as skew the real data.
There are multiple ways to approach this problem and none of them works 100% reliably, here are two steps to get you started.
Step 1
Firstly, go to View Settings and check the option that says “Bot Filtering”.

Step 2
Exclude known bots by their IP address. If you see high traffic from specific IP and you’re sure it’s not one of the very obsessed customers, you should exclude them.
You can do so by applying the IP filter discussed above, but there are some ways that work even better (need some more skills, though).
- Don’t load Google Analytics snippet for these users using Google Tag Manager
- Make your website unavailable for these users using Apache .htaccess file
Creating custom views
There are many occasions where you might want to create custom views in Google Analytics. Usually, these views don’t contain all sessions, but only a specific set of sessions. This is something you could easily achieve by using Google Analytics Filters.
Although, most of these results could also be achieved by using custom segments, having them as separate views makes a lot of sense if you analyze these segment frequently.
Traffic from specific country
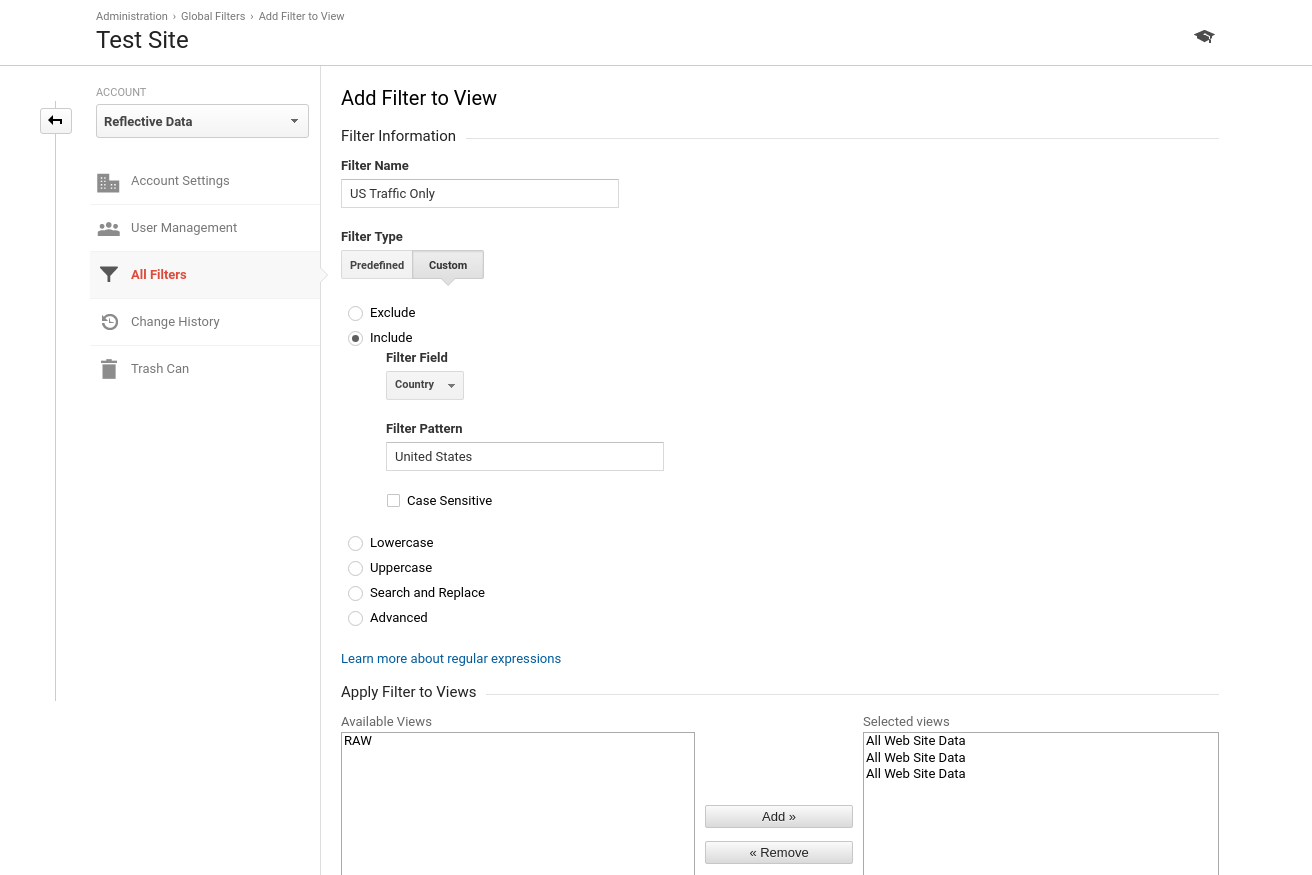
This filter can be extremely useful for businesses that only sell to specific countries. Therefore, traffic from other countries don’t really matter too much.
In this example, we are going to create a filter for visitors coming from the US.
- Filter Name: US Traffic Only
- Filter Type: Custom > Include
- Filter Field: Country
- Filter Pattern: name of the country
- Regex is allowed
- Views: all the views you want to apply the filter to
- Save
This is how your filter should look like:
Traffic from specific subdomain
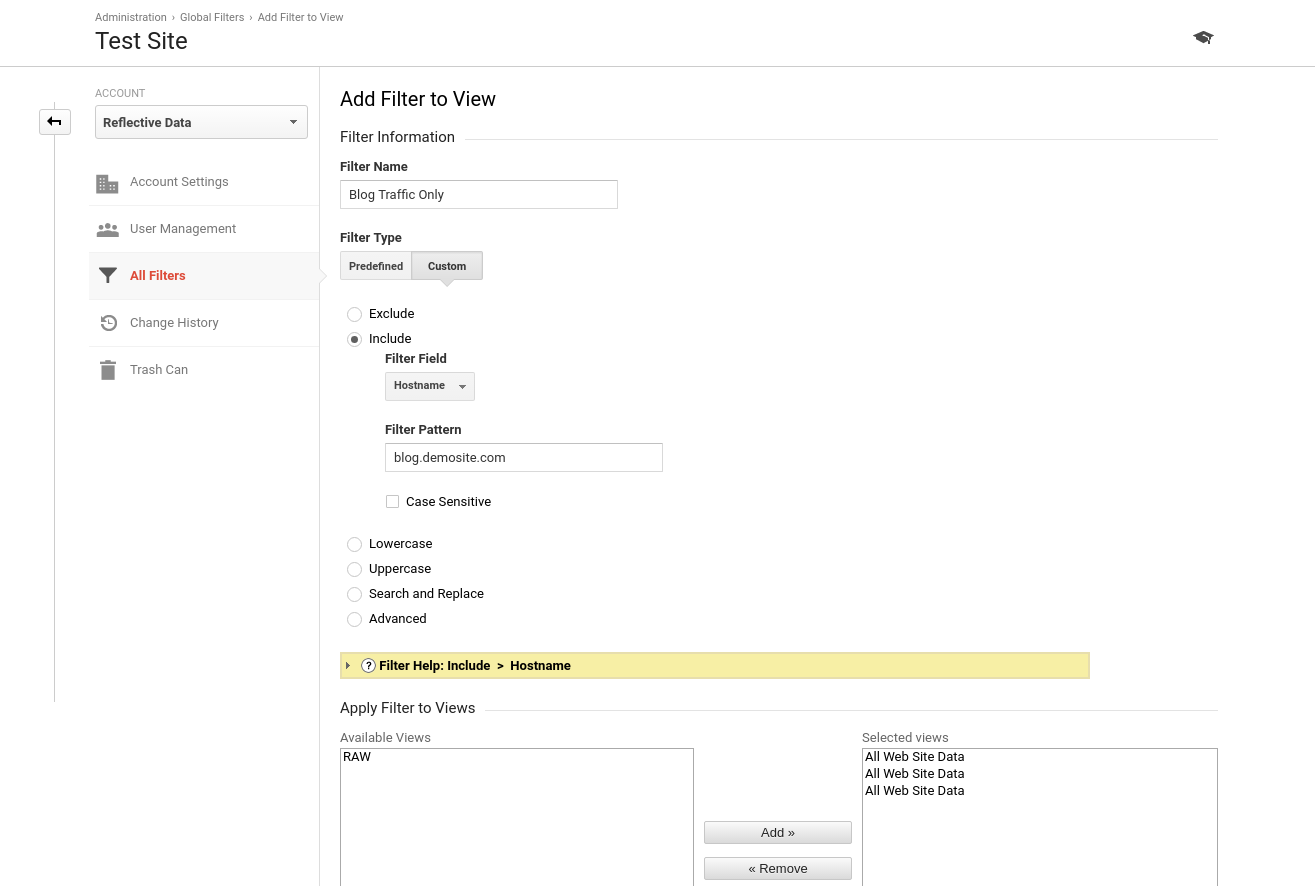
This can come handy for websites that have a blog, a forum, or something similar on a separate subdomain. Usually, each subdomain has its own purpose and goals, and should, therefore, be looked at as a separate instance.
- Filter Name: Blog Traffic Only
- Filter Type: Custom > Include
- Filter Field: Hostname
- Filter Pattern: hostname of the subdomain
- Regex is allowed
- Views: all the views you want to apply the filter to
- Save
This is how your filter should look like:
For many websites, the user experience is at least somewhat different on all major device groups (desktop, tablet, mobile) and should, therefore, be analyzed separately.
Here’s how to create a Google Analytics Filter for a specific device:
- Filter Name: Mobile Traffic Only
- Filter Type: Custom > Include
- Filter Field: Device Category
- Filter Pattern: device type
- Views: all the views you want to apply the filter to
- Save
This is how your filter should look like:

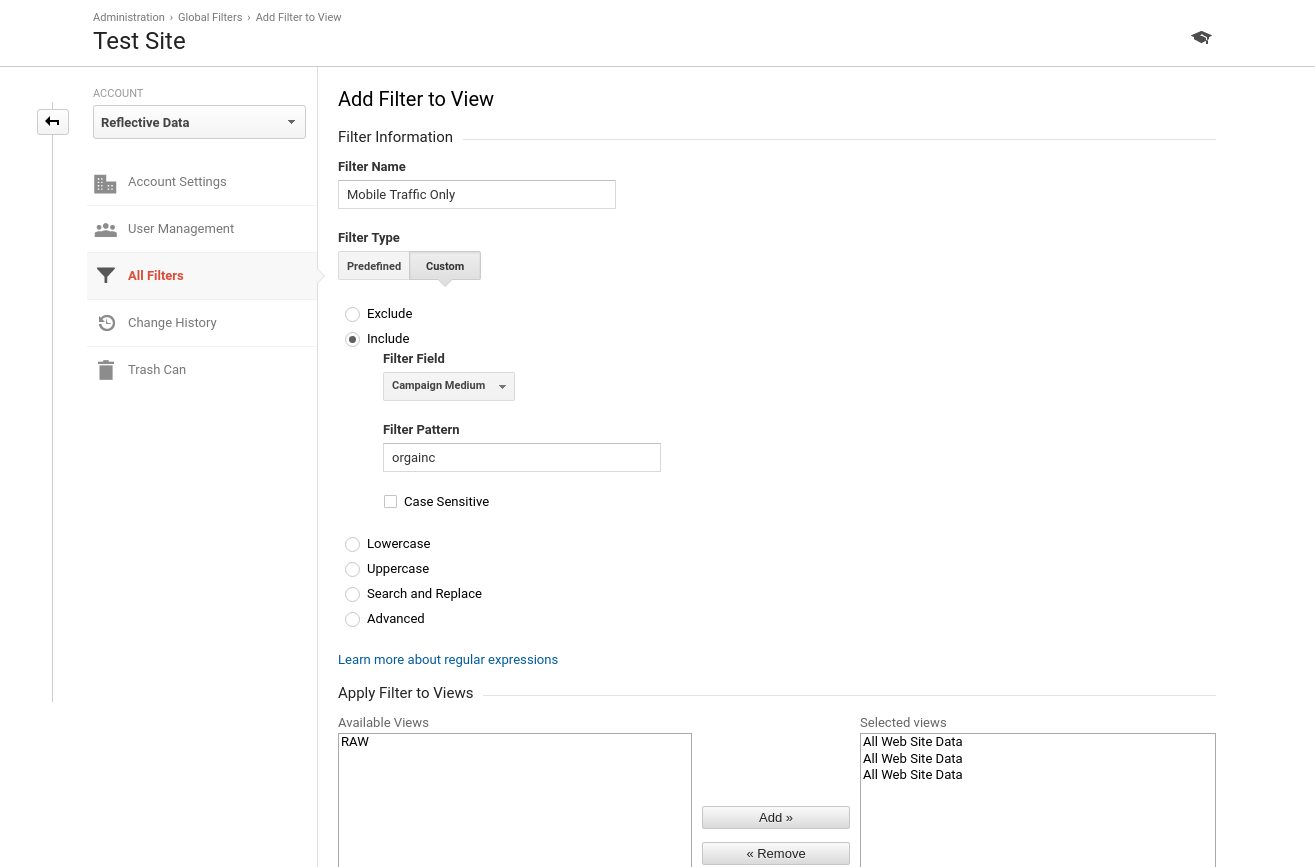
Sometimes in your analysis, you want to dig deeper into specific traffic source. In that case, it is super helpful if you already have a view for that specific source ready to use.
Here’s how to create a Google Analytics Filter for a specific traffic source:
- Filter Name: Mobile Traffic Only
- Filter Type: Custom > Include
- Filter Field: Campaign Medium
- Filter Pattern: medium type
- Views: all the views you want to apply the filter to
- Save
This is how your filter should look like:
Manipulating data
Google Analytics Filters allow you to make many useful alterations to the data that is being stored in Google Analytics. Some of them should be applied to specific views only and some of them would probably find a place in your main reporting view.
Here’s a list of four most popular filters to manipulate your GA data.
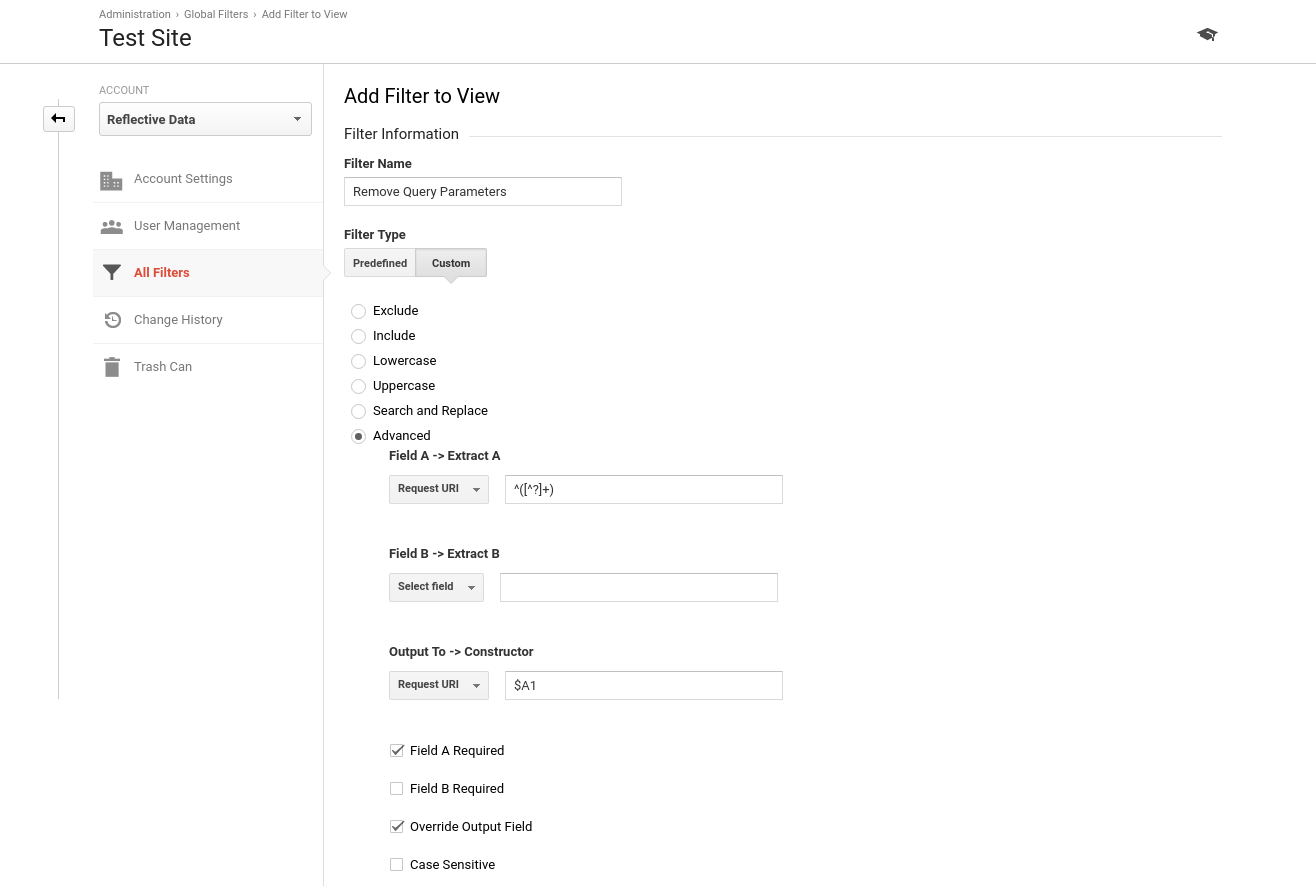
Remove Query Parameters
While you probably don’t want to apply this filter to all of your views, it can come very handy to have one which stores absolutely no query parameters at all.
Query parameters are pieces of URI that come after “?” (question mark). i.e. ?page=3
Here’s how you can create a view which removes all query parameters:
- Filter Name: Remove Query Parameters
- Filter Type: Custom > Advanced
- Field A -> Extract A: Request URI – ^([^?]+)
- Output To -> Constructor: Request URI – $A1
- Views: all the views you want to apply the filter to
- Save
This is how your filter should look like:
Prepend Hostname to Request URI
This filter is extremely handy (a must have really) when you are storing traffic from multiple (sub)domains in one account.
Here’s how you can create a filter that will add hostname in the request URI:
- Filter Name: Prepend Hostname to Request URI
- Filter Type: Custom > Advanced
- Field A -> Extract A: Hostname – (.*)
- Field B -> Extract B: Request URI – (.*)
- Output To -> Constructor: Request URI – $A1$B1
- Views: all the views you want to apply the filter to
- Save
This is how your filter should look like:

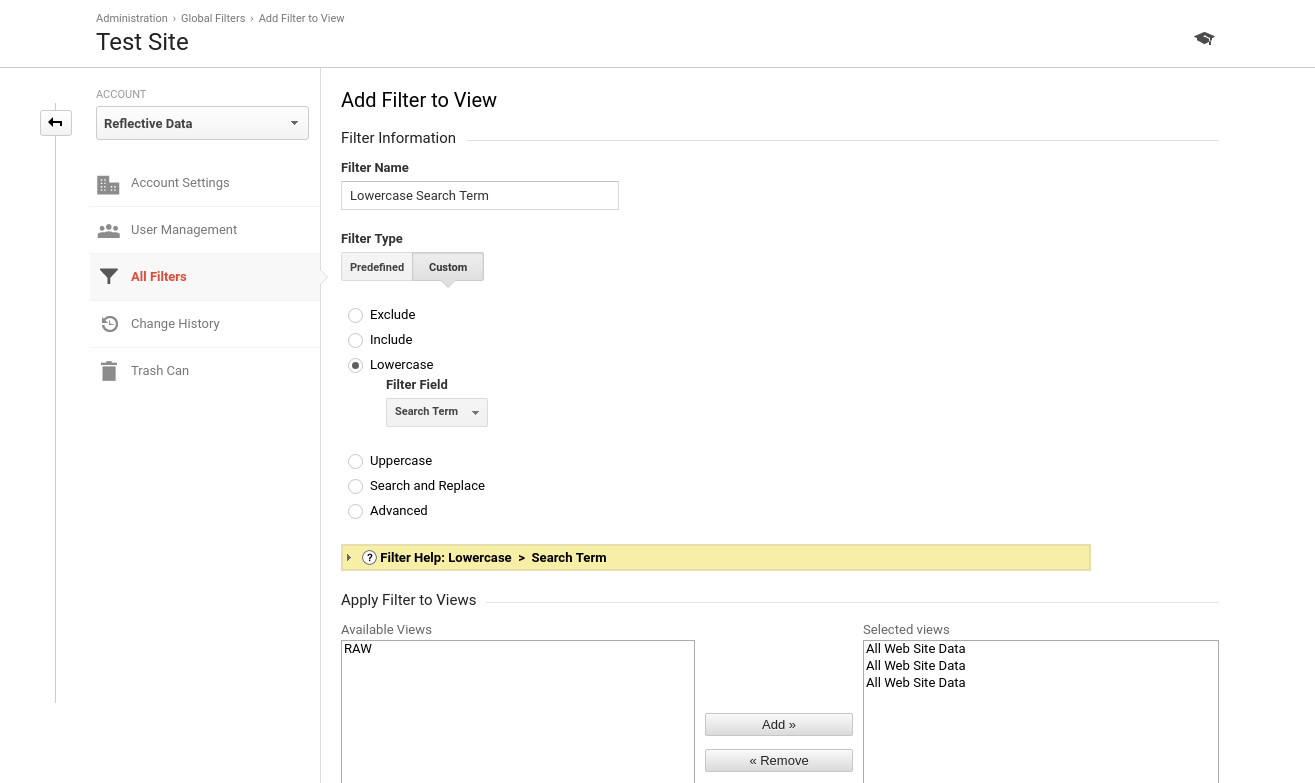
As your users may use both upper and lowercase letters while searching, it would make sense to store them all in lowercase in Google Analytics.
Here’s how to create a Google Analytics Filter to lowercase all search terms:
- Filter Name: Lowercase Search Term
- Filter Type: Custom > Lowercase
- Filter Field: Search Term
- Views: all the views you want to apply the filter to
- Save
This is how your filter should look like:
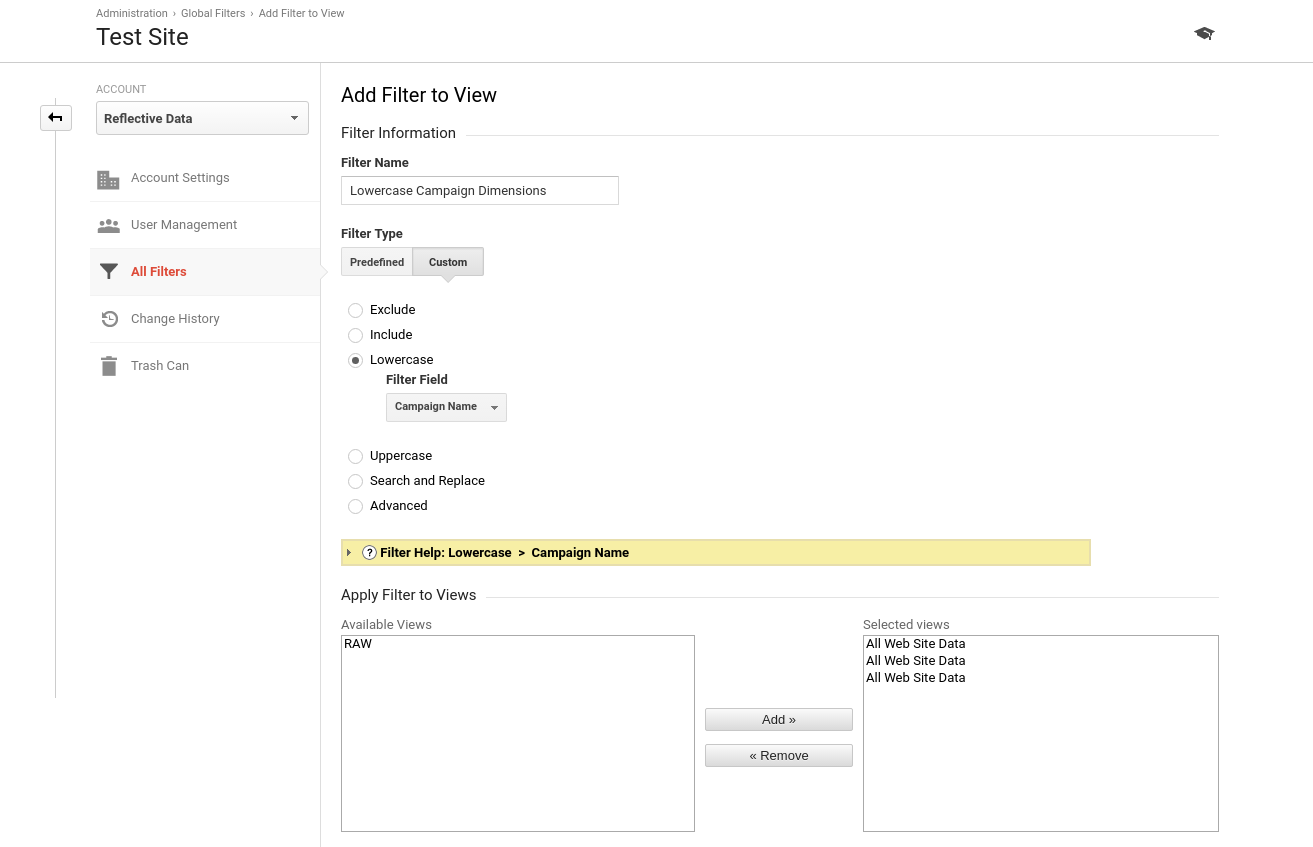
Lowercase Campaign Dimensions
This filter is extremely handy for companies which run a lot of campaigns coming from different teams and on different mediums. Having them all in lowercase makes it easier to keep everything consistent as just a simple difference in cases can make a single campaign into two separate ones in GA.
Here’s how to create a Google Analytics Filter to lowercase all campaigns:
- Filter Name: Lowercase Campaign Dimensions
- Filter Type: Custom > Lowercase
- Filter Field: Campaign Name
- Views: all the views you want to apply the filter to
- Save
This is how your filter should look like:
Conclusion
As you now know, Google Analytics Filters make a powerful feature that you can use in many ways to customize your setup specifically to your business. There are more advanced filters that you could use but in this article, we focused on the most important ones that could apply to almost any website.
You are also welcome to share your own filters in the comments below!
This article is part of our popular series Most common Google Analytics issues (in-depth overview)
Is anyone here in a position to recommend Enemas and Douches? Cheers xxx
I’ve been using GA for years, never really used the filters though. Going to create a few new views now, Thanks man!
Thank you for such a comprehensive overview of the filters. I’ve always wondered what’s the real use case. Now I know exactly!
Well done guys, love your blog!