
Visitors rage clicking on certain elements on your website is a good indicator of a UX error. For example, people may click on a blue text that is not a link or on an image that has no click functionality.
Detecting and fixing such usability issues is crucial, and luckily the detection part is doable using Google Tag Manager and Google Analytics.
Rage click is a situation where, in a short period of time, a website user clicks multiple times on a specific element. I.e. in two seconds, a visitor clicks three times on an image.
Without further ado, let’s see how tracking rage clicks works in Google Tag Manager.
Step 1 – Create a new Tag that detects rage clicks

This tag is responsible for detecting rage clicks and pushing a custom event rage_click into the data layer.
There are a few variables that you can play with to make it best fit your use case:
no_of_clicks – after how many clicks do we consider it a rage click. Default is 3.
time – in what time period should the clicks happen. Default is 2 seconds.
radius – in what radius should the clicks happen. Default is 100px.
The following variables are pushed into the data layer when a rage click is detected:
event – rage_click
rc_element – selector of the element on which the clicks happened
rc_count – the number of clicks
rc_max_distance – maximum distance between the clicks
rc_time_diff – period from first to last click
PS! You don’t have to send all of them to GA, pick the ones you think make the most sense.
Full code snippet. – Requires jQuery to be loaded on the page.
if ( typeof(jQuery) === 'function' ) {
    jQuery(document).ready(function($) {
        jQuery.fn.extend({
            getPath: function() {
                var path, node = this;
                while (node.length) {
                    var realNode = node[0],
                        name = realNode.localName;
                    if (!name) break;
                    name = name.toLowerCase();
                    var parent = node.parent();
                    var sameTagSiblings = parent.children(name);
                    if (sameTagSiblings.length > 1) {
                        var allSiblings = parent.children();
                        var index = allSiblings.index(realNode) + 1;
                        if (index > 1) {
                            name += ':nth-child(' + index + ')';
                        }
                    }
                    path = name + (path ? '>' + path : '');
                    node = parent;
                }
                return path;
            }
        });
        // Number of rage clicks
        var no_of_clicks = 3;
        //Time interval - 3 for 3 secs, 4 for secs and likewise
        var time = 2;
        var click_events = [];
        //internal variables
        var possible_click = 3;
        var radius = 100;
        function detectXClicks(count, interval) {
            var last = click_events.length - 1;
            var time_diff = (click_events[last].time.getTime() - click_events[last - count + 1].time.getTime()) / 1000;
            //returns false if it event period is longer than 5 sec
            if (time_diff > interval) return null;
            //check click distance
            var max_distance = 0;
            for (i = last - count + 1; i < last; i++) {
                for (j = i + 1; j <= last; j++) {
                    var distance = Math.round(Math.sqrt(Math.pow(click_events[i].event.clientX - click_events[j].event.clientX, 2) + Math.pow(click_events[i].event.clientY - click_events[j].event.clientY, 2)));
                    if (distance > max_distance) max_distance = distance;
                    if (distance > radius) return null;
                }
            }
            var result = {
                count: count,
                max_distance: max_distance,
                time_diff: time_diff
            }
            return result;
        }
        function removeUsedClickPoints(count) {
            click_events.splice(click_events.length - count, count);
        }
        $("body").click(function(event) {
            click_events.push({
                event: event,
                time: new Date()
            });
            //remain only required number of click events and remove left of them.
            if (click_events.length > possible_click) {
                click_events.splice(0, click_events.length - possible_click);
            }
            //detect 3 click in 5 sec
            if (click_events.length >= 3) {
                var result = detectXClicks(no_of_clicks, time);
                if (result != null) {
                    var path = $(event.target).getPath();
                    //console.log('Rage Click: ' + JSON.stringify(result));
                    dataLayer.push({
                        'event': 'rage_click',
                        'rc_element': path,
                        'rc_count': result.count,
                        'rc_max_distance': result.max_distance,
                        'rc_time_diff': result.time_diff
                    });
                    removeUsedClickPoints(3);
                }
            }
        });
    });
}
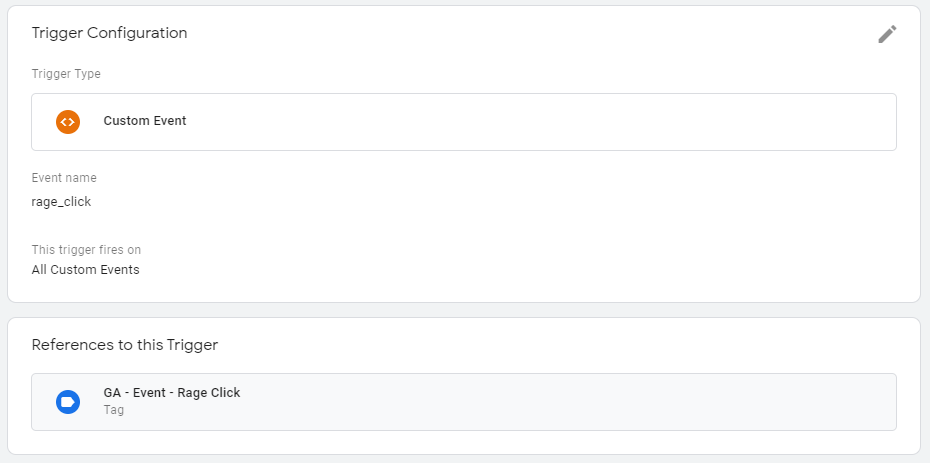
Step 2 – Create a new Trigger
The snippet from the previous step is pushing the rage_click event into the data layer every time a rage click is detected. Now we need to create a trigger that listens to that event.
Step 3 – Send an event to Google Analytics
Awesome, now let’s create a new tag that is responsible for sending the custom event to Google Analytics.
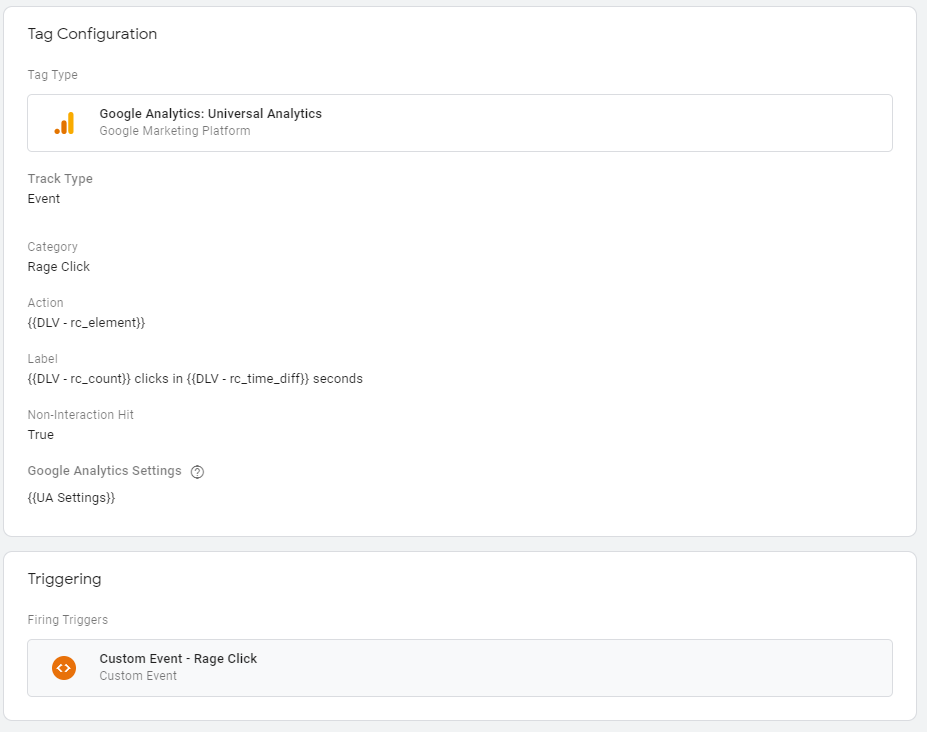
You can play around with the event parameters, especially with the event label to best match your needs but the recommended values are as seen in the screenshot above.
Before publishing your changes, don’t forget to enter the preview mode in Google Tag Manager and test the setup yourself. Go ahead and do a few rage clicks and see if an event is getting sent to Google Analytics. Also, check the event parameters and see if they match your expectations.
Step 4 – Using this data
Okay, so you have configured everything correctly, tested it and it works fine. Now, how do you put this data into use?
First, go into Google Analytics and find your rage click events. If you did as described in this post, you find them by clicking on Overview under Behavior –> Events, then find the “Rage Click” event category.
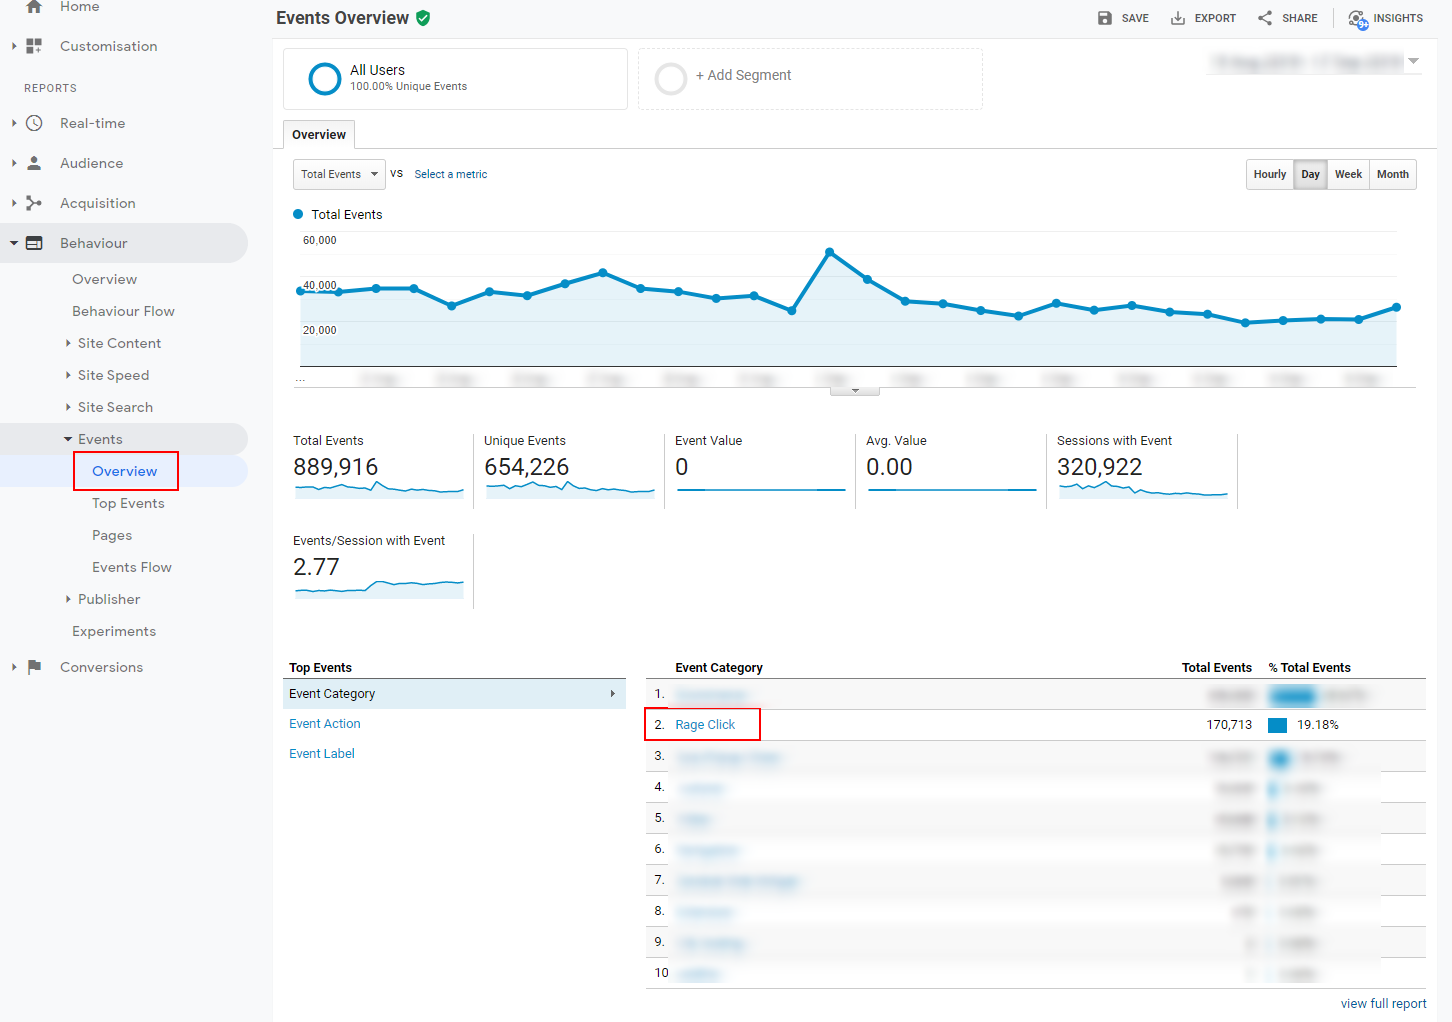
Click on the “Rage Click” event category and choose Event Action to see the elements on which the rage clicks happened.

Since elements with the same selectors might be on different pages, it might be helpful to apply a secondary dimension “Page”.
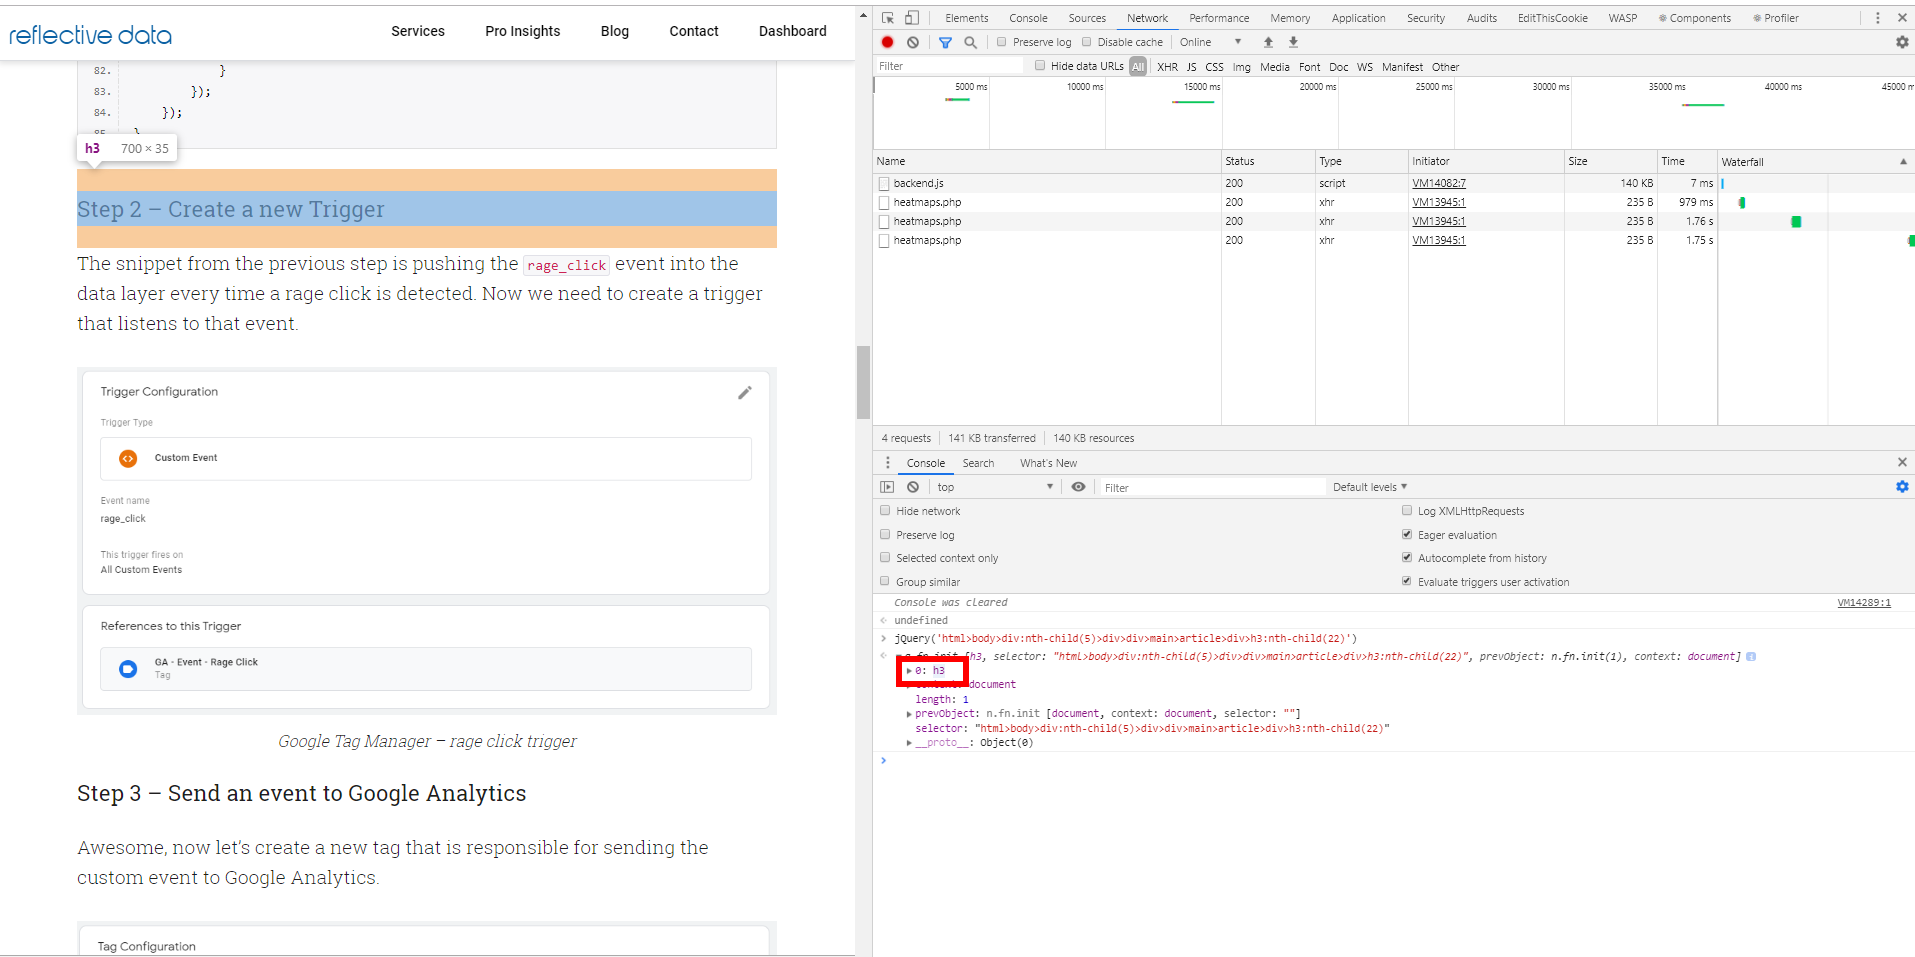
Now, all you need to do is to pick one element, copy its selector and go to the page seen in the secondary dimension.
Next, open the Javascript console of your browser (press F12) and paste your selector in the following format:
jQuery('YOUR>SELECTOR>HERE');
Hover over the line that was returned in the console and it should highlight the element in the DOM.
If you prefer element class over the selector, you can change the event action in GTM from the rc_element to GTM’s built-in Click Class variable.
Great! That’s it, should you need any help with tracking rage clicks using Google Tag Manager and Google Analytics, post your questions in the comments below.
Should you need further help with your analytics setup, take a look at our services.
Could you do the same for implementation with GA4 et tag manger ?
Hi – I’m trying to set this up and have no experience at all. I’ve got to the part where you set up a tag to send it to google analytics however in the google analytics settings tab it says “select settings variable” and when you click into that, its got a box for a tracking ID – what do I put here as nothing is working and I have no idea where to find the tracking ID.
the tracking ID = which GA account you are sending info to.
You can find tracking ID at GA -> admin -> property -> tracking info -> tracking code
A tracking ID looks like “UA-12345678-2”
will amazon spin off aws
It doesnt works for me .. It says all the DLV ( rc_element, rc_time_diff…) are unknown.
what can I do to solve it ?
From the VARIABLES tab, create a new data layer variable. Name the variable as DLV-rc_element and put “rc_element” (wihtout quotes) in the Data Layer Variable Name tab. Do the same for other unknown variables.
Hi,
Thanks for the details, it works well !
We see the event action & page recorded in Google Analytics. However, we don’t understand your very last explanation, I mean how to identify the rage click element in the page with the console…
From this for example : “html>body>div:nth-child(2)>div:nth-child(3)” or “html>body>div:nth-child(2)>div:nth-child(2)>div>div>div>div>div>div>div>ul>li>div:nth-child(2)>div>div>div>div>div>h1”
Hi!
If you’re using Google Chrome, open the developer tools, navigate to console tab and paste
document.querySelector('YOUR SELECTOR');in the input field and click enter. Then hover over the matched element to see which element it is.If you’re still having trouble figuring this out, I recommend asking your developer 🙂
Perfect, thank you 😉
I don’t speak JS, so I haven’t got a clue what this means.
I copied the JS from Github and when previewing GTM, I get following message: Error at line 1, character 3: Parse error. primary expression expected
What am I doing wrong?
Did you put your JS code between < script > < / script > tags?
Yes, still not working. There is jquery on the site.
if ( typeof(jQuery) === ‘function’ ) {
jQuery(document).ready(function($) {
jQuery.fn.extend({
Could you post a screenshot of your setup? This is how it should look like: https://i.imgur.com/h4edtde.png
It works, tnx!
Best tutorial I’ve seen in a while. Currently testing with different thresholds for rage click duration and radius. Thanks!
Hello Sarah!
I’m glad you liked this post. Should figure out the best settings, feel free to share them here with others 🙂
Hej
Is this idea still working? I have tried it several times and still with no positive effect. I have an idea, could you record a video step-by-step how you configured your GTM?
Hello Dawid,
Yes, it is working. We have the exact same setup live on different sites. We might do a video tutorial in the future but it is planned in a few months.
Could you provide some screenshots of your setup so we could take a look? Feel free to send them over via email silver@reflectivedata.com
Love the idea of this solution.
The only issue I have with it is the element detail.
When I have an element return of something like: ‘html>body>nav:nth-child(15)>div>div>div>div>span’
It has no meaning in GA.
I think it would be more beneficial to maybe utilise the Click Class variable within GTM, is this something that can be adapted in the code?
Regards
Hello Dino,
Thank you for your feedback. It really depends, we actually like grabbing the selector and pasting it in the console like $(‘your-selector’) to immediately see the element.
If you want the click class you can use GTM’s built-in variable as your event label.
Silver
Thanks for the response Silver,
That makes sense, I think I was thinking more around a GA users that isn’t so savvy using dev tools in Chrome.
I guess rage clicks are something that require interpretation to the wider audience.
I’ll have a play about to see what works best for us.
Many thanks
Dino
Sure and thank you for pointing this out, I’m going to add a few more details about this in the post.
Not here.
Only snippet i see, is that on the picture?
Oh, seems you are right. There’s something wrong with showing code snippets for non-logged-in users.
Added the gist link for now: https://gist.github.com/silversillu/52ad72eaee5450ace862f39e52f6b953
Thanks for poiting this out!
Could you share the script so we can try it?
I’m not sure what you mean by that. The full snippet is in the post.