The Enhanced Ecommerce tracking is my favorite feature of Google Analytics, yet so many companies are not using most of its features. It’s time to turn this into your competitive advantage.
While there are other creative use cases, in this article I’m focusing on tracking the websites that are actually selling goods or services online.
The goal of this article is to provide an up-to-date information and guidelines for implementing Google Analytics Enhanced Ecommerce tracking on an e-commerce site using Google Tag Manager.
Make sure you know the difference between regular Ecommerce tracking (ecommerce.js) and Enhanced Ecommerce tracking (ec.js). This article focuses on the latter only.
Setting up Enhanced Ecommerce tracking is not an easy task. It does require coding skills, understanding how Google Analytics data-collection process works and knowing your e-commerce platform. If you feel this might become overwhelming I strongly recommend considering hiring an expert.
Why Google Tag Manager?
There are multiple approaches to get the Enhanced Ecommerce tracking up and running. You could do everything with pure JavaScript (and analytics.js), depending on your choice of e-commerce platform there might be a great plug-in (i.e. WooCommerce Google Analytics Pro) or you could use Google Tag Manager.
In case you run a small web shop and don’t have any coding skills, a plug-in might be a good choice. Find the best one built for your platform, read the reviews and if it looks decent, install it and see what it does. Definitely better than nothing and a good way to get the taste of Google Analytics’ advanced features.
Google has a comprehensive guide for implementing Enhanced Ecommerce using GTM, our approach is somewhat different, though. The setup process described in this article is more flexible and works better with any other trackers you might run on your site. In many ways, the process is influenced by the tips from Simo Ahava.
Here are the top three reasons why I almost always recommend doing your setup Google Tag Manager.
- Good structure. With GTM you’ll build your setup using variables, triggers, and tags, giving you a nice and structure system that is both easy to understand and edit.
- Full control. While being easier to configure and maintain, you will have the same flexibility as with pure JavaScript, something you won’t see in a plug-in.
- Version-independent. You don’t have to think about which version of Google Analytics is running under the hood, GTM will take care of this. Currently, GTM is using analytics.js but that might change to gtag.js quite soon. Making this transition yourself is quite a lot of work.
Process overview
To make it easier to understand the whole system, I am giving you a short overview of how the process works.
- Exposing data from the back-end (e-commerce platform and/or content management system (CMS)) on the front end – building the
dataLayerobject. - Include and
eventvariable in yourdataLayer, this will trigger the right tag that sends data to Google Analytics. - If all the required fields are set, send data to Google Analytics.
We’ll go through all of the steps listed above giving a good knowledge of how the Enhanced Ecommerce tracking works.
Now, let’s quickly cover the information that we are going to collect. You do not have to include all of them in your setup but I strongly recommend to track rather more data-point than less.
Actions
These are the actions which are triggering Enhanced Ecommerce tags in Google Tag Manager and are therefore being tracked by Google Analytics.
- Product impressions
- Clicks on products
- Product detail views
- Adding/removing products from the shopping cart
- Checkout visits
- Purchases
- Refunds
- Clicks on internal promotions
Dimensions
These are the data-points sent with some or all of the actions listed above.
- Product info (name, price, brand, quantity, variant, category, SKU)
- Product list info (category page, search results etc.), including list position for each product
- Checkout step (user details, shipping, payment details)
- Checkout options (i.e payment method)
- Promotion details (name, creative, position)
- Transaction details (affiliation, revenue, tax, shipping, coupon)
- Local currencies
- Refund information
I think you will agree that this is a lot of data, and if implemented properly you will have a very good foundation for finding insights that would take your business to a whole new level. There are literally limitless ways you could put this data to use. But first, let’s see how to get the system up and running.
Populating the dataLayer
This part depends highly on the CMS or e-commerce platform you are using. Therefore, the examples used here are general and will help you understand the process but you should definitely not just copy-paste any of the code without fully understanding it.
Getting this step right requires both coding skills and knowing the platform used. If you don’t feel comfortable doing this, I strongly recommend finding someone who is.
The ultimate goal here is to push the right JavaScript code with the right variables to the client side of the website. I do so only if the certain criteria are met, i.e there was a successful purchase or a product was added to the shopping cart.
With PHP, your code should look something like this:
dataLayer.push({
    'transactionId' : '<?php echo $transactionId ?>',
});
It is possible to populate the
dataLayerusing JavaScript DOM scraping i.e. using$(selector).each();. Though, you should think twice before doing so.This is in many ways less reliable than populating it with the code coming straight from the backed. So, whenever possible, avoid this solution.
Now, let’s take a look how the dataLayer should look like for all of the actions that we are going to measure.
Note that every time we send an object, we also include the event variable. This will be covered in more detail in the next chapter, right now it is important to know that this event will be used to trigger our tags.
Use Data Layer or read data from variable
When implementing Enhanced Ecommerce with GTM, you need to figure out how you are going to access the data in GTM.
There are two options, using the dataLayer or reading value from a Custom JavaScript Variable. In this article, we are going to with the second option. Simo Ahava has a great article on why and how to do so.
Product Impressions
This feature is used to keep track of the products that the user has seen on your site. For example, items on the category page or the results of the site search.
If the products are available when the page loads, it makes sense to send this information together with the pageview.
dataLayer.push({
  'ecommerce': {
    'impressions': [
     {
       'name': 'Triblend Android T-Shirt',       // Name or ID is required.
       'id': '12345',
       'price': '15.25',
       'brand': 'Google',
       'category': 'Apparel',
       'variant': 'Gray',
       'list': 'Search Results',
       'position': 1
     },
     {
       'name': 'Donut Friday Scented T-Shirt',
       'id': '67890',
       'price': '33.75',
       'brand': 'Google',
       'category': 'Apparel',
       'variant': 'Black',
       'list': 'Search Results',
       'position': 2
     }]
  }
});
Add to Cart
There is no point in covering all the possible data types that you can track with Enhanced Ecommerce in this article but let’s quickly take a look at tracking add to carts. For other actions, such as product detail views and transactions, take a look at the official documentation. The logic is the same.
window.dataLayer.push({
  'event' : 'addToCart',
  'ecommerce' : {
    'add' : {
      'products' : [{
        'id' : '12345',
        'name' : 'Donut Friday Scented T-Shirt'
      }]
    }
  }
});
Creating the Tags and Triggers in GTM
Ecommerce Data Layer Variable
As we are pushing all of the ecommerce related data into a dataLayer variable called “ecommerce”, let’s make it a variable in GTM, too. This allows for an easy access in other places in GTM where we need to access the information stored in this variable.
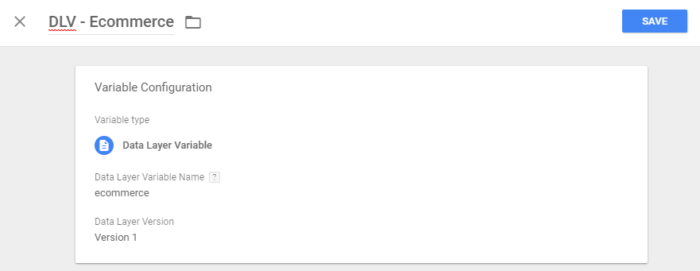
Using the Version 1 (not Version 2) of the
dataLayerhelps us avoid the process called “recursive merge”, which is a great feature but in terms of ecommerce can make things a bit more difficult.
Sending Product Impressions with a Pageview
First, let’s create a Custom Javascript Variable for impressions.
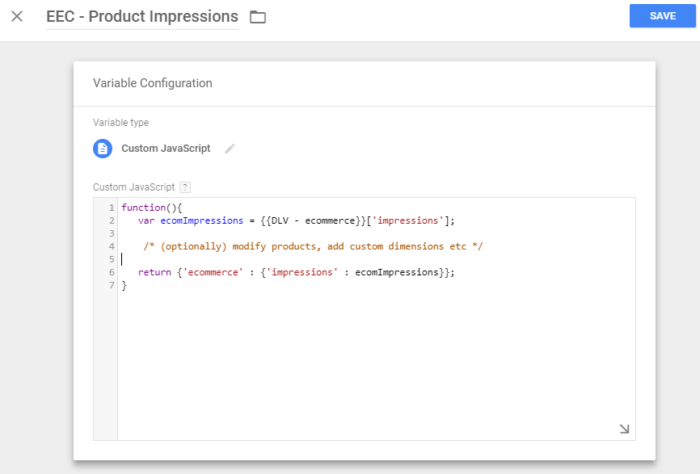
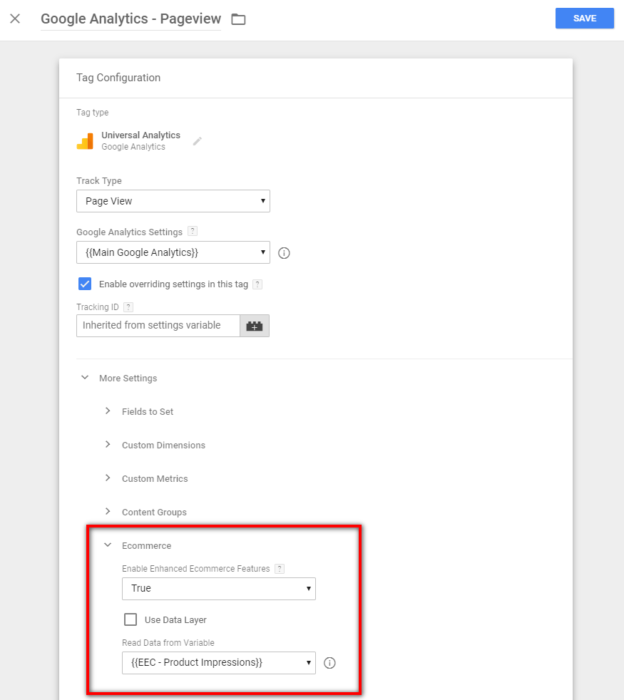
Then go ahead and modify the tag that is sending the pageview to include the impression data from the newly created {{EEC - Product Impressions}} variable.
Add to Cart Variable
First, let’s create a Custom Javascript Variable for the products that were added to cart.
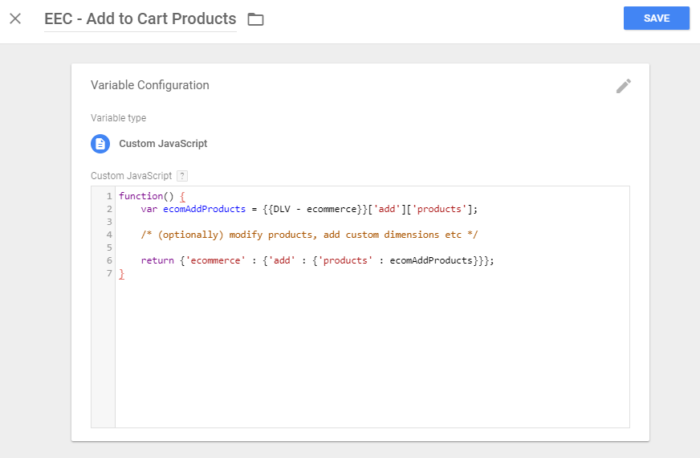
Next, we need to create a trigger that would run whenever a custom event addToCart is pushed to the dataLayer.
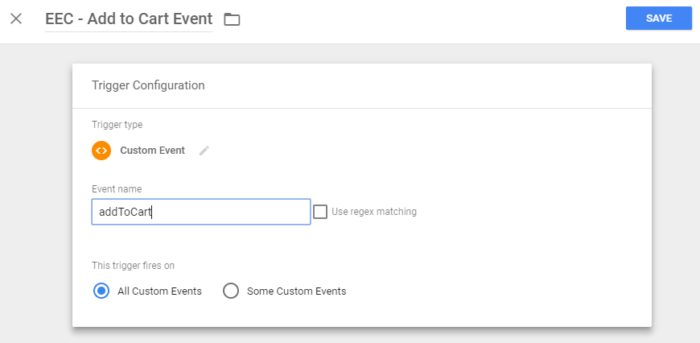
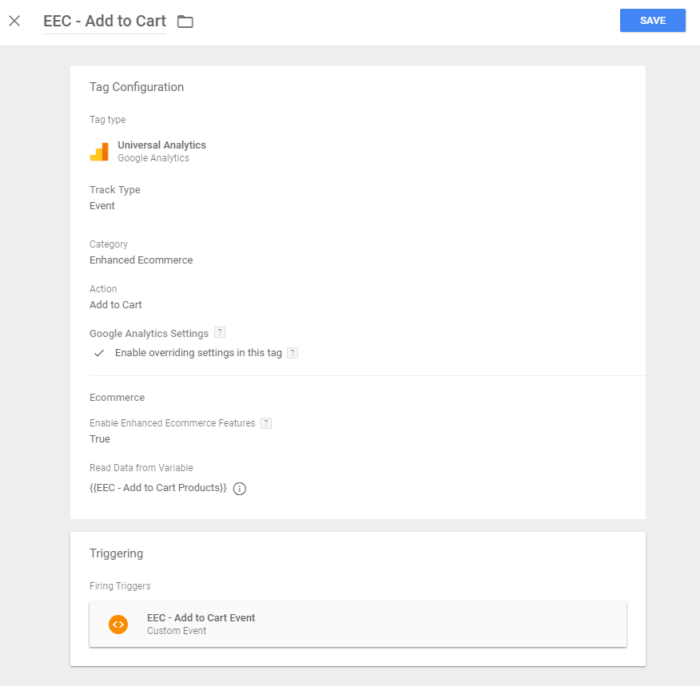
And now, let’s create a tag that sends product data with a custom event to Google Analytics every time the Add to Cart trigger runs.
Quality Assurance
A broken setup that’s feeding you with false data is worse than having no data at all. This is something you should avoid at all costs, here are some things you should definitely do before considering your setup as ready:
- Go through the funnel and see what data is being sent. Including test purchases. You could use developer tools network panel or an extension like Tag Assistant for Chrome.
- Compare the numbers in GA to the numbers in the back-end and CMS. It is crucial that all of the sources match.
- Hire a third party to conduct a proper audit. This is the most effective solution and gives you a peace of mind.
While there’s no need to conduct a full audit every month, for an active business that is constantly changing the site and is making important decisions based on Google Analytics, a proper audit every 6-12 months is definitely worth the money.
Some parts of the audit can even be automated. For example, we have built a system that automatically compares data in GA to the data in the CMS for several companies. This helps to find the errors the fastest.
Things to Keep in Mind
Is dataLayer available?
If there is the slightest chance that your code will run before dataLayer variable is defined, check for it.
window.dataLayer = window.dataLayer || [];
// window.dataLayer.push(..
Consistency is everything
Enhanced Ecommerce is built based on hit level data. This means that GA does not automatically connect the hits (impressions, detail views, add to carts etc.) unless you push exactly the same product details in every step, with every hit.
Exception: for tracking checkout steps, you only need to (and should) send the product array with the first step. For the following steps, all you should send is the step number (and options such as payment type).
Valid Custom Javascript Variables
Make sure that your Custom Javascript Variables will always return a valid {'ecommerce' : {}} object.
We recommend reviewing the Enhanced Ecommerce Data Types and Actions section of the Enhanced Ecommerce Dev Guide to help you plan your implementation. The guide will help you understand which fields are required and optional for each of the ecommerce interactions you want to measure.
Conclusion
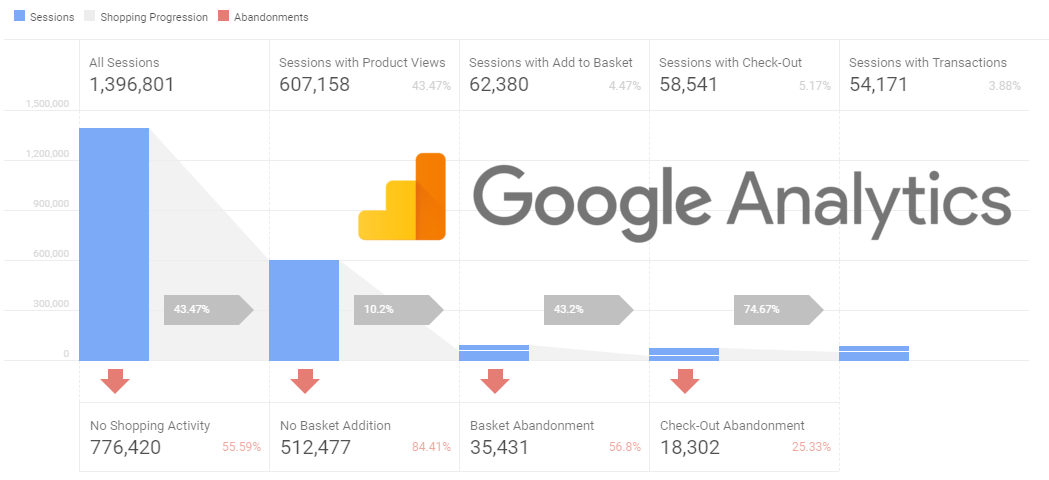
Enhanced Ecommerce is by far the most advanced feature of Google Analytics, it provides both a very broad overview of how the business is doing as well as a detailed product and transaction level information allowing for a deeper analysis.
While there are some plug-and-play solutions available for better-known e-commerce platforms (Shopify, WooCommerce etc), having a decent, tailored to your business setup does not come easy. It requires both a good planning of what and in which format should be tracked as well as an expert-level developer to make it all happen.
While many areas of your analytics system can (and should) be improved over time and it is okay to start off with very little (a few events, some goals etc), Enhanced Ecommerce is a whole and should be handled as one. At the very minimum, all transactions should be tracked. A recommended minimum setup should include product impressions, detail views, add to carts, checkout steps and purchases.
Should you have any questions related to configuring Enhaced Ecommerce, ask them in the comments section below.
Hi, can somebody tell me if I want to show users how many impressions and clicks each product has got, how to implement that? How to use analytics data to show those values to website viewers?
I don’t understand the need to create custom variables in GTM for these things? shouldn’t you just add them as they are defined in the documentation directly in the dataLayer.puh()? Seems like putting an extra variable is just a waste of time
It is possible to avoid custom variable and this is probably fine if you send data to GA only. With two or more destinations, it is always a good idea to have a unified format for all destination – a custom variable is a good example of such unified format.
Thank you for this. I’ve been looking around for materials to help me learn to setup enhanced ecommerce using google tag manager and I have found several but at first glance I think your post seems to answer the other questions I have. I’m bookmarking this post so I can use it as my reference as I implement it on my test site. I got here via GrowthHackers, btw.
Hello Jeff. I’m glad to hear you found this piece helpful.
Should you have any questions about Enhanced Ecommerce that are not answered here, post them in the comments and someone from our team will try to answer them.